I made these cookies twice. I first tried making bars out of them with my girlfriends and the second time around, I ended up making individual cookies. The shortbread base is a bit crumbly once it's been baked, so it's hard to cut through them cleanly. So my suggestion is to cut out shapes or at least cut them into bars before baking.
I think if you are trying to make them look exactly like the Samoas cookies, they are going to take some more time, but if you're willing to have fun and play around with it, it will turn out really cute and will be just as tasty. The second time for me was way easier than the first. I've made some adaptations, which I hope will make your first time way easier too. So roll up your sleeves and get baking peeps. You no longer have to wait a year to eat these cookies.
Homemade Samoas (a.k.a. Caramel de-Lites) Cookies
adapted from www.bakingbites.com
Ingredients
Shortbread Base
1 cup butter, soft
1/2 cup sugar
2 cups all purpose flour
1/4 tsp baking powder
1/2 tsp salt
1/2 tsp vanilla extract
up to 2 tbsp milk (optional)
Preheat oven to 350 degrees F. In a large mixing bowl, cream together butter and sugar. Mix in flour, baking powder and salt at a low speed, followed by the vanilla and milk, adding in the milk as needed to make the dough come together without being sticky (I didn't end up adding the milk and it was fine). The dough should come together into a soft, not-too-sticky ball. Add in a bit of extra flour if your dough is very sticky.
Roll the dough (working in two or three batches) to about 1/4-inch thickness (or slightly less) and use cookie cutters to make rounds, bars or shapes.
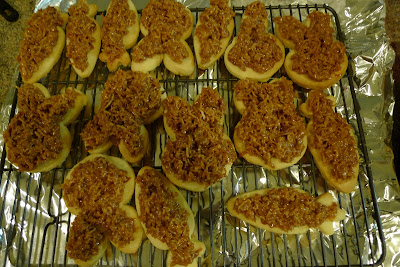
I asked Jung if he had any round cookie cutters at home and he rummaged through one of his drawers and come up with a bunny and carrot-shaped cookie cutter. These were too adorable not to use, so we decided to make bunny and carrot samoas cookies instead. Very fitting for spring, right?

Place the cookies on a parchment lined or greased baking sheet. Bake cookies for 10-12 minutes, until bottoms are lightly browned and cookies are set.
Cool for a few minutes on the baking sheet then transfer to a wire rack to cool completely.

I particularly liked this one. Jung used the leftover dough to make a nose. Too bad it would get covered with caramel and coconuts.

Caramel/Coconut Topping
2 to 3 cups shredded coconut (sweetened or unsweetened)
12 to 16-oz good-quality chewy caramels
1/4 tsp salt
3 tbsp milk or water
8 oz. dark or semisweet chocolate chips
Preheat oven to 300. Spread coconut evenly on a baking sheet (preferably one with sides) and toast 20 minutes, stirring every 5 minutes, until coconut is golden. Cool on baking sheet, stirring occasionally. Set aside.

Jung had a scale on hand so we measured out 12 ounces of caramels. I used about 14 ounces of caramel this time around because the first time I made this, it wasn't sticky enough and wouldn't really hold on to the cookie.

Unwrap the caramels and place in a large microwave-safe bowl with milk or water and salt. Cook on high for 3-4 minutes, stopping to stir a few times to help the caramel melt. When smooth, fold in toasted coconut with a spatula.

It should look like this once you're done. The original recipe called for 3 cups, but again I thought the first time there was too much coconut and not enough caramel, so I omitted a cup of coconut. If you want more coconut, just beware that you will need to add more caramel or else it'll be too dense and won't be sticky enough. If it starts to harden to quickly, reheat the caramel in the microwave for a few seconds.

Using the spatula or a small offset spatula, spread the topping on cooled cookies, using about 2-3 tsp per cookie. Our cookies were bigger so I used a lot more topping, but it ended up covering the cookies perfectly. Reheat caramel for a few seconds in the microwave if it gets too firm to work with.
Jung also suggested we add a layer of caramel in between the cookie and coconut topping to act as the glue, so we peeled about 7 more caramel pieces separately, melted them in a bowl and put a thin layer of caramel in between the cookie and topping and it worked beautifully. Try it out and if your layer sticks without this extra caramel, then this step is not necessary. I left the edges in tact with these cookies because I wanted you to be able to see the shape, but if you are making round ones, just cover the cookie entirely.
While topping sets up, melt chocolate in a small bowl. Heat on high in the microwave in 45 second intervals, stirring thoroughly to prevent scorching. Dip the base of each cookie into the chocolate and place on a clean piece of parchment paper or a flexible, hard surface, like this plastic sheet.

Drizzle the cookies with the remaining chocolate (or melt a bit of additional chocolate, if necessary).

I'll let you in on a little secret. We used a disposable syringe (my uncle's a doctor), filled it with chocolate and drizzled the chocolate that way. But since not many people have disposable syringes on hand (I'd be concerned if you did), transfer the chocolate into a piping bag or a ziplock bag with the corner snipped off and drizzle finished cookies with chocolate. Or if you're lazy like me, just drizzle it with a fork. It'll look more like a Jackson Pollock painting, but it'll still be tasty.

Let the chocolate set completely before storing in an airtight container. The cookies will only peel off cleanly if the chocolate has completely hardened. We put the cookies in the freezer for a few minutes to hasten up the process. These are monster cookies. They are pretty big and thick; they almost look like rice crispy treats. I didn't get to taste them because it was way too late and then I had a plane to catch the next day, but the word at my cousin's is that they are de-lite-ful. =)

my homemade samoas were divine! Chewy...the shortbread was crumbly was still yummy and talk about the chocolate!! A Very generous portion of chocolate! love love love it!
ReplyDeleteyour new camera is sooooooo much better than the old one! these cookies and the chocolate dipped shortbread cookies were my fav from when we made them
ReplyDeleteMary - Yay! I'm so glad you like it. Now you can make them at home too!
ReplyDeleteJung - Right? I love my new camera. =) It was pretty dim in there too. Now only if I can learn how to use Aperture.
did u get an slr?
ReplyDeleteNo, I got a point & shoot camera from Panasonic. My previous camera was ancient so this is so much better. I love it!
ReplyDeletei just re-read your blog and i admit, i giggled that jung had a rabbit shaped cookie cutter! lol
ReplyDelete